This is the page that will be under the most construction. Please tell me what you really want to see. If you need additional help, feel free to e-mail me at Baaababy@aol.com with your question. I will do by best to answer it and if I can't I will refer you to someone who can.
Showmanship
Pivoting
Training for showmanship can be a fair amount of work. The hardest part of the class would probably be the pivot. That’s where the horse leaves one foot on the ground and goes around in a circle. To train to pivot, you must.
- Figure out which foot your horse pivots on.
You can accomplish this several ways. The best way would probably be to put a halter on him, and walk into him. Watch his back feet to see which one he stays on the most while going in a circle.
- Start with the voice commands.
When you want your horse to understand your command, repetition is the key. When I train a horse to pivot, I have one hand on their neck and one holding the lead. I walk into him and push his neck to get him where to go. Another way would be to keep going in circles, and pushing back on the foot. Sometimes the horse gets too far forward or is too far back and that will cause him to step out. By pushing and pulling back on the horse, and saying pivot each time, they will eventually understand what you want them to do.
- PRACTICE, PRACTICE, PRACTICE
Pivoting can be one of the hardest things to train a horse. You really want to practice daily. Keep repeating pivot as they go in a circle. After you feel they are starting to get the hang of it, stand about a foot away from them and pull up on the lead. Do everything you did before, just not with your hand on their neck. Make sure you tell them good boy or girl when they do a full circle correctly. If you can’t see their foot, then you are too far forward. You should always be able to see both of your horses back feet. The farther one you will have to bend over and lean to see, but that is only during practice.
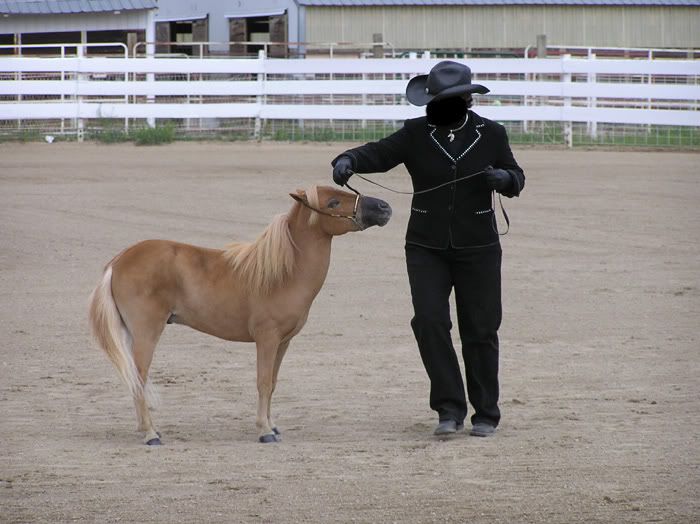
Here are a few pictures of how to correctly hold the lead, how to stand and how NOT to make your horse pivot.
How to correctly pivot... 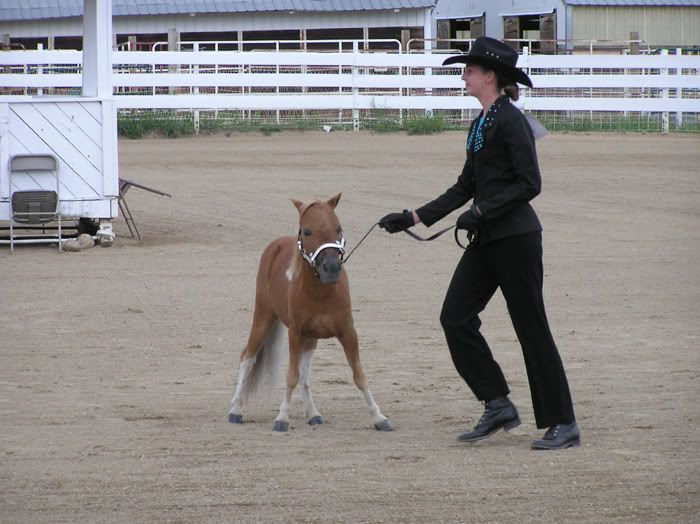
Walk into their head, they should start to turn their head by themselves...
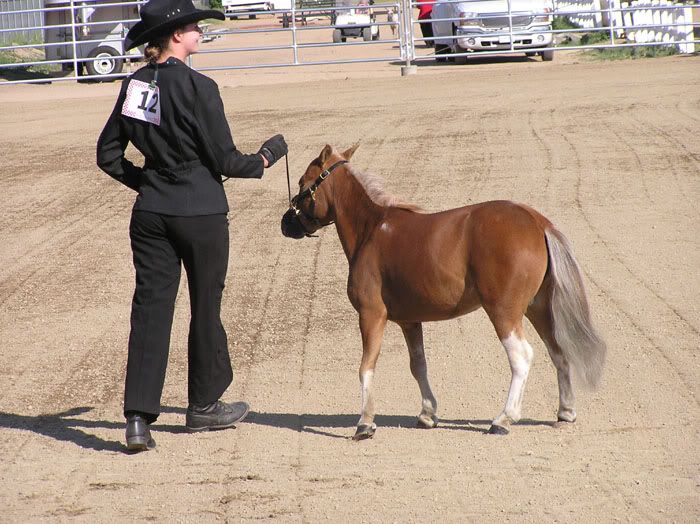 Start the turn by making sure your hips are still square with the horses head. This is also where you should start pushing and pulling to keep them on the leg.
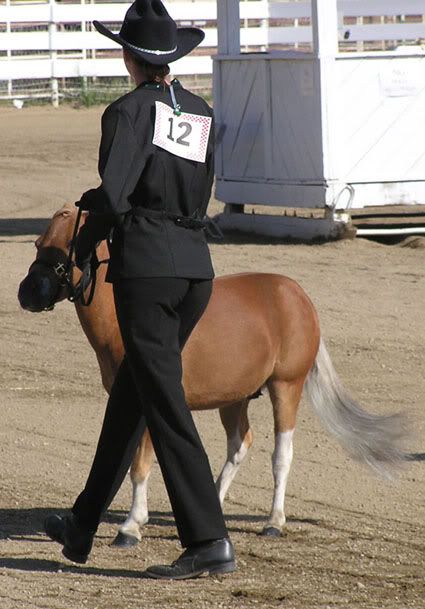
Finishing the circle. See how the back leg on my side has not moved once?
This is how NOT to pivot
Showmanship Patterns
There are 3 different patterns in miniature showmanship. There are also different ways to step, but that is discussed in “Halves or Quarters”
Pattern 1
Pattern one is the easiest of the patterns. It is usually done by the 7 and under group, but that is not necessarily how it works.
You will walk into the arena and set up your horse. Body turned to the judge and feet pointed at your horse. It will be uncomfortable. When the judges acknowledges you to come up, turn your feet so they face straight with the judge. Walk your horse up and complete your pattern ((discussed in “Halves or Quarters”)) when finished, do a half circle ((180 degree)) pivot and stop. Look back at the judge and smile. Trot your horse all the way PAST the lineup and do another half circle pivot. Stand back in the lineup and cross in front of your horse as needed to stay away from the judge.
Pattern 2
The 8-12 group usually does this.
Walk into the arena and set up your horse, as you will for all 3 patterns.
When the judges acknowledges you to come up, turn your feet so they face straight with the judge. Walk your horse up and stop in the middle. Do a full circle pivot and the keep walking up to the judge. Do your pattern. When finished, do a half circle pivot and trot past the lineup. Do another half circle pivot and line up again.
Pattern 3
This is what the 13-17 and Amateur groups usually do.
Walk into the arena and set up your horse, as you will for all 3 patterns.
When the judges acknowledges you to come up, turn your feet so they face straight with the judge. Walk your horse up and complete your pattern ((discussed in “Halves or Quarters”)) when finished, do a half circle ((180 degree)) pivot and stop. Look back at the judge and smile. Trot your horse HALFWAY and stop. Turn around and smile at the judge. Turn your feet to the horse again and do a FULL circle pivot. Stop, look back and trot past the lineup and do another half circle pivot. Line up again.
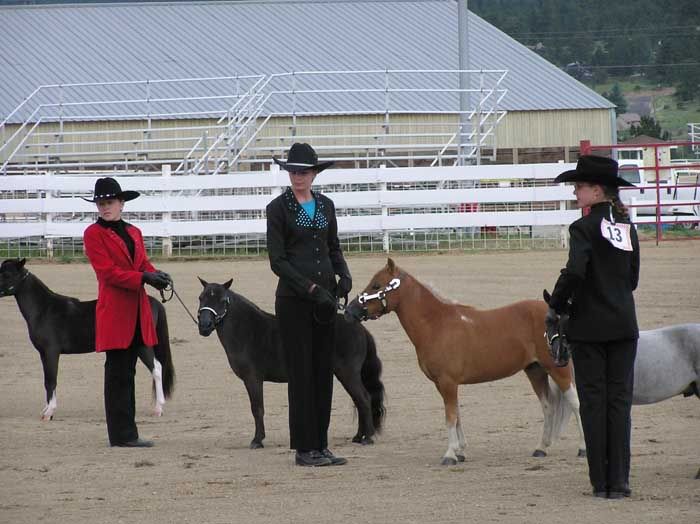
Standing in the lineup for showmanship
Halves or Quarters
There are two different ways to complete your pattern. They both involve a variety of steps and due need some practice.
AMHA- The AMHA pattern is what we call halves. When the judge passes the withers, you will cross over IN FRONT of your horse, so that you are on the same side. When they go around behind your horse, you will cross back over to be on the same side of the judge. When they pass the withers again, you will cross back over and when they stand in front of your horse, cross back to your original starting position.
AMHR- The AMHR pattern is done in quarters. Unlike the AMHA, you NEVER want to be on the same side as the judge. You will start out with the judge in front of your horse. When the judge passes the withers, you should take a small step ((only about the width of a foot)) AWAY from the judge. When they go around behind your horse, you will cross to the other side. When they pass the withers on the other side, you will take another small step away. Then when they are in front of your horse again, you will cross back to the side you started on and pivot away and continue as according the pattern you are doing.
 Jumping
Rules
In miniature jumping, there are 2 styles, hunter and jumper.
Hunter-based on what the horse looks like going over the jump. The horse should maintain the same gait throughout the entire course. There is a maximum of 6 fences no taller then 24 inches tall
Jumper-based on how high the horse jumps. If the horse makes a clean run, as well as others, there is a jump off. AMHR-based on how fast you can do the course, as well as how high the horse is jumping. In other words, grab your horse and run for your life. In AMHA though, there is no time. Take as much time as needed to set up for the jump. The fences will keep being raised in height until someone knocks over a fence.
Training to Jump
Training to jump is one of my personal favorites. Some of the horses I have trained include
Buck On Brazos
Stout Wild Buttons N Bows
LNR's Flyin High
Lowes Dealer
Rock Patches-Shetland pony
Time to get in shape! Put a halter on her and take her for a run around your property. For my horses they pick up on MY pace, I don't pick up theirs. I train so that when I start jogging, they are following in a trot.
How I accomplish this?
Sounds terrible, but I will use a whip. Not at first though. I do give them chances. I will do the classic pull on the lead rope to get them going with me. First what I try to do is train them that when I kiss to them, they trot. If they refuse to trot, out comes the whip.
I will stand at their shoulder ((ALWAYS AT THEIR SHOULDER, REMEMBER THIS!)) and then I will smack their butt with a whip at the same time I start to job and I am kissing to them. Confused yet? I repeat 3-4 times and then on the 5th time I do the same actions, only no whip. Normally my horse understands what I want by them and then I can only improve.
So now that your horse understands the idea of running with you, it's time to train HOW to run. You want to be running at their shoulder, but you always don't want a horse you have to pull back to stay with them, or that you are dragging along.
My advice- go for a jog. It will get you both in shape  As silly as it sounds, I play a game of red light green light with my horse. I will stop completly still. Then when I decide its time to go, I kiss and they have to immediatly trot to be able to continue on. Say 15 feet down I will stop rather quickly. If my horse is walking before they trot. They will stop and sit for 15 seconds. Then I will try it again. If they mess up again, they either get to back up and get one more try, or I get out the whip for more kiss training.
As for the jumps, you still aren't ready quite yet. If you really want a horse that knows how to perform effortlessly, you HAVE to master the basics..
The two styles of jumping
Hunter-based on form and maintaining an even gait throughout the course
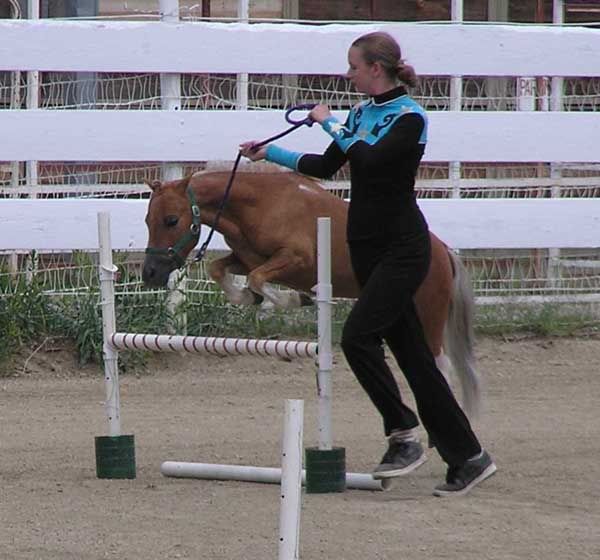
Jumping- in AMHA-based on how high the horse can jump, AMHR- is how fast you can get your horse to run and jump.
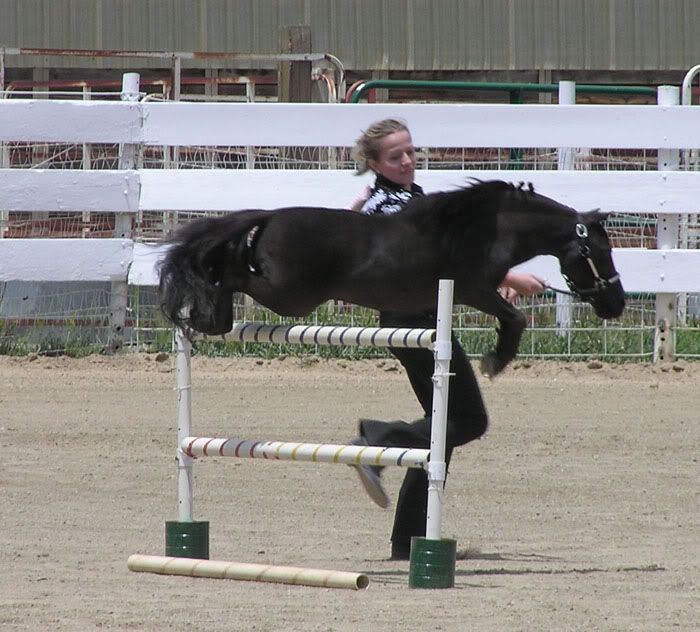
Harlans Rocio-owned and shown by Breanne Loesch Liberty
Liberty-based on how the horse moves.
Two people go into the ring, the catcher and the assistant. You should have a minute and 30 seconds of a song of your choice previously recorded and handed to the judge before you go into the ring.
Liberty for me is a very important class. My horses know what they are doing before they go into the ring. I do this by training them the basics at home.
I will go into an arena- or pen in my case - and perform exactly like liberty would, except for the music. I stand in the middle of the arena and when I feel it's time, I release the halter and I tell my horse to go. I have a whip and I snap it as they are leaving. I let them run the way they want. However, they have to use the WHOLE arena. If they start cutting corners in an area, I will chase them and yell at them.
My secret weapon for Liberty - food. I have always had horses that come to me with a beckoning of my finger. Thats because at home when I train, I use grain. I knee and I call them to get their attention. They know I have grain in my hand, and they will walk up to me. Now you CAN'T have grain in the show ring, nor bait of any kind. I don't use any in the ring.
What I do before I go into a ring is I give them a handful of grain. Then they perform and are caught WITHOUT and treats. Then after we are out of the arena and waiting for placings, they will get a handful of grain just as they would have in the ring.
Halter
Halter has got to be one of the hardest classes to train for. Though it may look easy, it takes hours upon hours to get the correct set up in a horse, a nice expression and just to get the horse to listen to you. The biggest thing is having your horse set up and stand still.
When I start out training a horse for halter, the thing I want to teach them is to stand still. I don't want a horse who is figiting around the ring. I think it looks quite unprofessional.
What you want to do, is start by teaching the horse to stand still. Pick an area that you are comfortable working in. Walk your horse to the area, and then turn around and give whatever cue you prefer to use and make your horse stop. I like to say "Ho, Stand" myself. Once the horse is standing still, I repeat stand over and over. If they move even a foot, I say "No" in a very stern voice and I back them up 10-15 feet.
I will repeat this technique until my horse understands that "Stand" means to stand still. Once your hrose has mastered this, you are ready to set up.
Tell your horse to stand with the cue you have trained into them, and then comes to tricky part. You will need to bend down and place your horses feet in the correct "set up" position. It may take a while to figure out yourself just how to set your horse up squarly and nicely. It really all depends on the body type of the horse.
When your horses feet are in place, repeat stand over and over just as you had when they were being taught to stand still.
This will take TIME and PATIENCE. For the next few weeks - depending on how fast your horse learns - you will need to place your horses feet in the square position and get them to understand that when you say "stand" that they are to set themselves up.
After enough time, you will be able to trot your horse and the when you pull up on the lead and say "stand" or the cue you desired, your horse will be able to set themselves up.
Halter isn’t judged on how well you can set up your horse, but it does help. A horse that is set up fast has more time to be looked at by the judge. Halter is judged on conformation. A good judge will be able to see a horses conformation in almost every situatution, but that is not always the case.
Judges Tip: At the last show I attended, I was in a halter class and Peanuts feet were a little out of sync, so I bent down and placed them where I wanted them to be. When the class was over the judge came over and talked to me. She told me that a judge likes to see a horse that can set up all on their own, and that its hinting at your horses conformation flaws if you set the feet by hand. This may not be true for all judges, but for Nadine and Jerry Kesting of Kamelot Miniatures, this is what they prefer.
Another thing to remember is ears. They should be perked forward. I can be difficult to get the ears, but I suggest you make little noises, sprinkle dirt, take a hat off your head, try anything you can - without being distracting to other exhibitors. The horse should always be alert and be paying attention to you.
To help practice for halter, take your horse out and stand him up like you would in a class, and have him stand like that for 10 minutes or so. Make them back up if they move. Remember, patience is a virtue! This is a hard thing to teach them, and it will take time!
Obstacle
Obstacle is a very fun class, however, it takes the most work. It is a class based on more then trust, it’s based on how you can handle your horse. Obstacle will have a variety of different things to cross, walk over, back up.ECT.This is also one of the hardest classes to train for considering you will never know exactly what they will have in store for you.
One should start training for obstacle by walking your horse over various things. I usually walk my horses over tarps, over logs, plastic bags, just about anything. Another thing you should train for would be backing and side passing. Backing up is extremely important. Your horse must back in a straight line, and not put their feet over the poles. Your horse should also be able to turn when backing, in order to complete a variety of shapes on the course.
Backing
This is NOT an easy thing to train a horse. As said many times before, it will take patience. Before you practice this, your horse should be fairly good at reading your body language. This is very important.
My favorite technique, is to really work slowly. First I will set up two LONG poles a good 3 feet parallel to each other. I will turn the horse around so that he is straight to back up in the first place. Starting position is essential. When my horses attention is on me, I walk into him. I pull my leadrope down towards his chest and calmy I tell him "back" If he doesn't understand, I will take my thumb and press it into his chest. Not hard by any means,it just reinforces the backup idea.
PRAISE IS VERY IMPORTANT.
Backing will take time! You are NOT going to perfect it on the first day. If your horse takes a single step back, release pressure and tell him what a good horse he is. Keep working on this.
I have had several questions where the own is having issues with the horse simply moving sideways and not actually backing up. My advice to you for this, is to stick this horse against a wall or a fence. The side they move at the most towards the fence. This has always helped me. They understand that they cant move sideways to get away from you.
You never know what you will find when you enter an obstacle course.
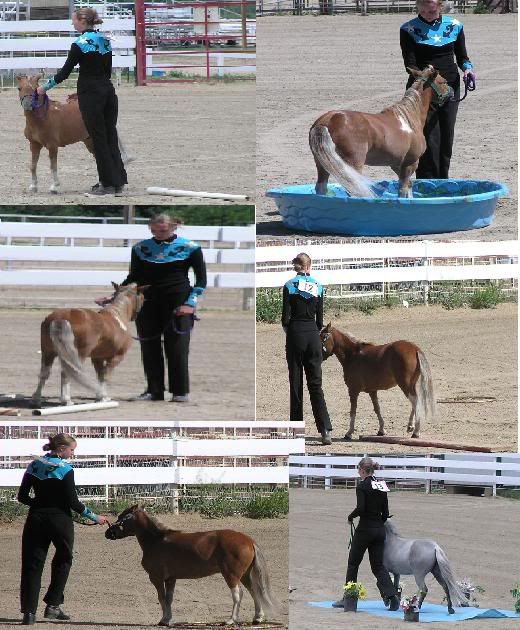
Side passing is one of the harder things to teach as well. Your horse should be able to basically walk sideways going both ways.

